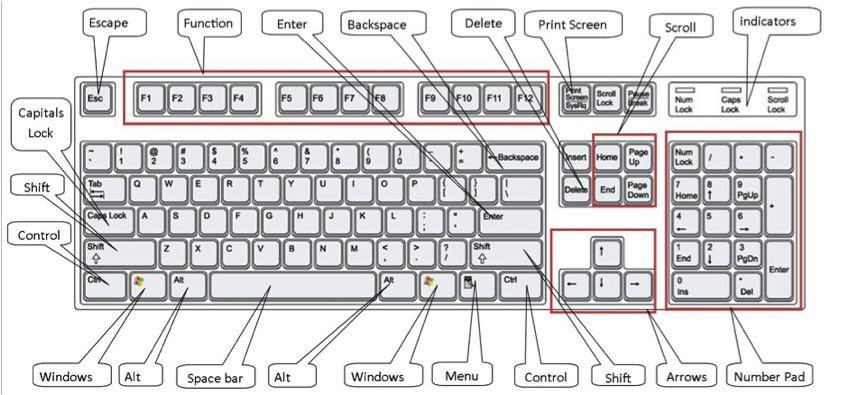
Please open the Keyboard with Call Outs JPG version by clicking the image, this link or on the attached JPG listed below.
The ENTER key
If you press the ENTER/RETURN key the editor will create a new paragraph. You can also use ENTER/RETURN key with a combination of other keys on your keyboard with the SHIFT key. For example, pressing the SHIFT+ENTER keys simultaneously will just break the line in the same paragraph.
Here is an example of a "soft return" when the SHIFT+ENTER keys are used together
to send text with a break
to the next line within the same paragraph.
A "hard return" when the ENTER key is pressed on the keyboard, starts a new paragraph with a blank line between the text as shown here.
The BACKSPACE key
As you know the BACKSPACE key is used for deleting mistakes, whole words or whole text. You can also use a combination of CTRL and BACKSPACE keys. If you press them at the same time you will erase the whole word which was before the cursor.

Cutting
To begin cutting the text, highlight the text you want to cut. After highlighting the selected text, you can “cut” the text in three different ways.
1. By clicking on the scissor icon on the toolbar.
2. By clicking on the right mouse button on the highlighted area. A context menu will appear. Select “cut”.
3. By clicking on the combination of CTRL+X keys.
Copying
You can also copy a highlighted area in three ways.
1. By clicking the copy icon (two pieces of paper) button on the toolbar.
2. By clicking the right mouse button on the highlighted area. A context menu will appear. Choose copy.
3. By clicking the combination of CTRL+C keys.
Pasting
By pressing the combination of CTRL+V keys or clicking the paste icon (clipboard with lined paper) on the toolbar. This option will paste data into the editor.
Note: There's a possibility that because of the security settings in your internet browser, the editor will be unable to paste the data directly from your clipboard. If this should occur, a dialogue box will appear with instructions what to do next.
The Undo and Redo functions of our Editor make text editing easier by remembering the actions performed in the editor window and making it possible to revert them as needed.
Undo
The Undo feature is a quick way to cancel the recently introduced change and restore the document to its previous state.
This is especially useful when the last performed operation was particularly destructive to the document, like in a situation when you select all of its content and accidentally delete it.
In order to revert the last action, activate the Undo command in two ways:
1. Press the button on the toolbar.
2. Press the Ctrl+Z combination on your keyboard.
By default, the editor supports 20 undo levels, you can usually go back as many steps as required.
Redo
The Redo feature lets you revert the last undo operation. This means that the document returns to the state it was in before you performed the undo.
In order to revert the last undo operation, activate the Redo command in two ways:
1. Press the button on the toolbar.
2. Press the Ctrl+Y combination on your keyboard.
Just like with undo, many redo levels are supported, so you can usually go forward as many steps as required.
The Find and Replace features allow you to quickly search the text as well as retain its consistency. They also make editing the text easier since you can batch change multiple occurrences of a phrase with just one mouse click instead of manually finding and modifying each one of them.
Since both are closely related, they are implemented as one dialog window with two tabs that let you switch between the Find and Replace option.
Note: Because the default position of the dialog window is on top of the document in the editor, you might need to drag the Find and Replace window in order to see the highlighted terms.
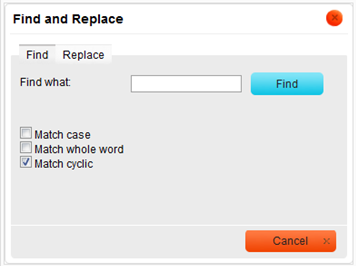
Find
If you want to find a word or a phrase in your document in a quick and efficient manner, use the Find command. To open the appropriate dialog window, press the "ab ac" button on the main editor toolbar.
The Find tab consists of a search field and a few options that let you refine the search:
Find what – is the text field where you enter the word or phrase that you want to find.
Match case – checking this option limits the search operation to words whose case matches the spelling (uppercase and lowercase letters) given in the search field. This means that the search becomes case-sensitive. (i.e. when Match case is checked and the search term is: "option", you will find all instances of "option" with this exact spelling but not when the word is spelled "Option" or "OPTION".
Match whole word – checking this option limits the search operation to whole words.
For example, when Match whole word is checked and the search term is: "option", you will find all instances of "option", but not the words "optional" or "options".
Match cyclic – checking this option means that after the editor reaches the end of the document, the search continues from the beginning of the text. This option is checked by default.
After you enter the search term and select the options, press the Find button and the editor will highlight the first occurrence of the term in the text, starting from the current position of the cursor in text and going down. If you want to jump to the next occurrence of the term in the text, press the Find button again.
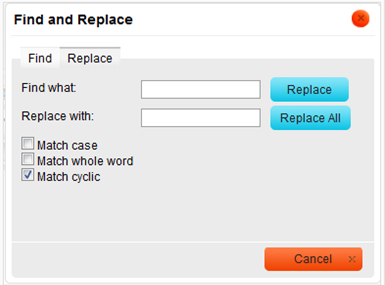
Replace
If you want to quickly find a word or phrase in your document and replace it, use the Replace command.
To open the appropriate dialog window, press the "ab ac" button on the main editor toolbar.
The Replace tab consists of a search field, a replace field and a few options that let you refine the operation:
Find what – is the text field where you enter the word or phrase that you want replace in the document.
Replace with – is the text field where you enter the word or phrase that will replace the search term in the document.
Match case – checking this option limits the search and replace operation to words whose case matches the spelling (uppercase and lowercase letters) given in the search field. This means that the search and replace becomes case-sensitive.
For example, when Match case is checked and the search term is: "option", you will find and replace all instances of "option" with this exact spelling, but not when the word is spelled "Option" or "OPTION".
Match whole word – checking this option limits the search and replace operation to whole words.
For example, when Match whole word is checked and the search term is: "option", you will find and replace all instances of "option", but not the words "optional" or "options".
Match cyclic – checking this option means that after the Editor reaches the end of the document, the search and replace continues from the beginning of the text. This option is checked by default.
After you enter the search term as well as the replace term and select the options, press the Replace button. The editor will highlight the first occurrence of the term in the text, starting from the current position of the cursor in text and going down. If you want to replace the highlighted term, click the Replace button once more. Then, if you want to jump to the next occurrence of the term in the text, press the Replace button again.
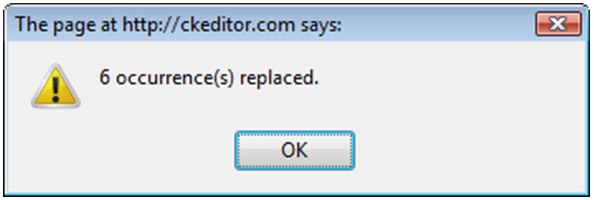
You can also replace all occurrences of the search term in the document in one go. In order to do that, press the Replace All button. The editor will then replace all occurrences in the whole document at once and display a pop-up window with the result of the operation. This is what the result window looks like:
Text Selection
When you want to apply a formatting method to a larger text fragment, you can select it. The editor supports a few selection methods that you can use.
To select all contents of the document, click inside the editing area and press the toolbar button. All document elements, including text, images, or tables, will become highlighted. You can now apply whatever action you wish to the selected content.
Alternatively, you can also use the Ctrl+A keyboard shortcut to select everything inside the editing area.
Selecting a Document Fragment
A popular way to select document fragments is to use your mouse. Keeping the left mouse button pressed, drag your mouse over the document content that you want to select. The selection process will finish, when you release the mouse button. A document fragment selected with your mouse will become highlighted. You can also select individual words by double-clicking them.
Document fragment can also be selected with your keyboard:
Using Shift+Arrow lets you select the text by letters and the Ctrl+Shift+Arrow — by words.
The Shift+Home combination selects the text from the cursor to the start of the current line, while the Shift+End — from the cursor to the end of the current line.
The combination of Ctrl+Shift and the Home or End keys let you select the text from the cursor to the beginning or end of the document, respectively.
The Shift+PgDn and Shift+PgUp shortcuts select a text fragment of approximately the length of the editing area starting from the cursor and going down and up the text, respectively.
- End of Topic -
Thank You for using ESQSites.
"Web design and hosting service for legal professionals."